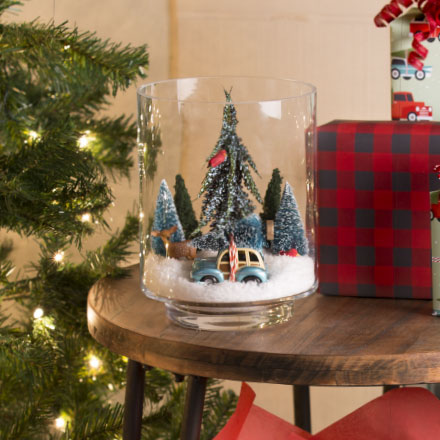
Home for the Holidays: DIY Holiday Showpiece

Let's face it, we all love a good DIY but they usually sound easier or less expensive than they turn out to be. While you're home for the holidays, we have an exciting DIY project you can easily make without even having to run to the store. Think of us as the Blue Apron or Hello Fresh of the fundraising industry haha!
Our DIY Holiday Showpiece combines an adorable Vintage Car - which doubles as an ornament - and a pre-packed accessories kit that was hand curated for you. So basically, when you buy the Holiday Showpiece Kit, all you need to do is figure out what will hold your showpiece... and we promise you probably have something lying around the house already that will work great!
This holiday showpiece will be the perfect addition to your holiday decor and is certain to be the focal point of your entire room!
Whether you're home and trying to sneak in a quick and easy DIY project, or if your spending time with family, this unique project will spruce up your space. But first, a little bit of background on where we came up with this timeless concept. The holiday season usually focuses on twinkling lights, delicious smells coming from the kitchen and family time. What better way to plan a quick project with your kids or significant other than an easy DIY that will make memories year after year? The vintage car with cute tree atop was inspired by Christmases years ago when families would pile into old sturdy cars to cut down the family tree. The vignette continues throughout the home with our adorable vintage car wrapping paper get yours here!
"Why can't the holidays look great...and be easy too?

So, let's get started!
1. First, let's get all of our materials together! The Holiday Showpiece Bundle comes with everything you'll need to put together an amazing finished product. It includes the Vintage Car ornament, a doe, some festive little birds, 3 mini trees, faux snow and snowflakes and rhinestones to really make the scene pop!get yours here!
2. Then, pick something to setup your scene inside of or on top of. We used a candle hurricane from Crate & Barrel... but, like we mentioned before this doesn't need to cost you any extra! You might have a decorative charger at home if you plan to set your holiday showpiece out of reach of curious fingers. Or, with summer just come and gone, try a mason jar drink dispenser! See links below for some options:
Crate & Barrel Hurricane
Mason Jar Drink Dispenser
3. The easiest way to start is to lay out all of your materials. For our showpiece, we emptied the faux snow into the bottom of the glass hurricane. If you pour it slowly, there's less chance the snow will stick to the sides of the glass!
4. Place your Vintage Car in first! It's the heaviest piece and will be the focal point of the piece so get a good spot. The more you move the car around, the deeper it will sink into the snow, so keep this in mind! Some might want the car to sit lightly on top, others won't mind the realistic look of the car with snow up to it's ears!
5. Now this is where you'll want to take your time. If you're a perfectionist, or working with little handle, some kitchen tongs or beauty tweezers will give you extra control without making a mess. Next place the tallest tree into your desired spot. If you want to bury the base of the tree, the easiest way is to twist the tree from side to side.
6. Once you get the hang of placing the accessories, you'll move a lot quicker. Place the additional trees, the doe, and the birds into the scene exactly how you want them! We managed to balance the birds in the tree with a little hard work. If you're having a hard time, you could glue them to the tree or just set them into the scene! A little bird perched on the car would be super cute as well.
7. The final touch! Go ahead and sprinkle the rhinestones and snowflakes over the top of your showpiece. They give a special sparkly touch that finishes off the project nicely!
That's it, you're all done!
